
Short tutorial on using technologies like Django, Docker, Nginx and Postgres. In this part, we use docker-compose to run up containers of an Nginx webserver, a Gunicorn application server, a Django app, and a postgres database. This is a continuation of Django Build 1, and focuses on the deployment aspect of the application.
Note: This tutorial requires you to have basic knowledge of python and linux commands.
BACKGROUND
In the previous tutorial, we made a django application and connected it to a local postgres database instance.
Now, how do we deploy this application?
Should we just simply take a computer, run the default django server on it and open its ports? Well, then who will handle the load balancing if we have multiple apps on the same project? Who will handle security, from say, certain types of DDoS? All this is not present in that server. This is why we called the given server in django “light weight”. It cannot handle production level load. So, here we need a web server.
A web server is an entirely different class of software, which requires a lot of customization, so Django cannot possibly ship with a one-size-fits-all production server out of the box. This is where we bring in Nginx.
Nginx

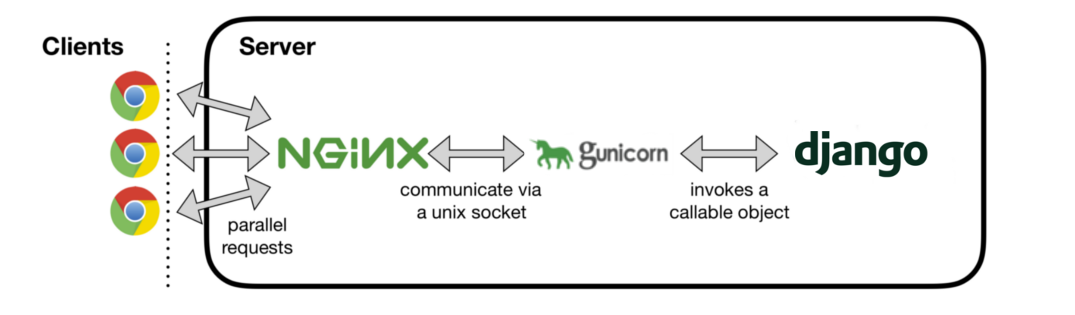
Pronounced Engine-x, is a web server that can also be used as a reverse proxy, load balancer, mail proxy and HTTP cache. We will be using Nginx as a reverse proxy, and will ignore the other functions for this tutorial. As a reverse proxy, Nginx server will read all the incoming traffic, and then forward it to our application. Basically, it will handle request traffic, but it does no sort of processing.
Great, so now we’ll just connect Nginx to Django right?
Nope
The issue is, Nginx is written to be a very fast http web server but it has no way of handling different types of applications. It does not know how to talk to different frameworks like Django, Flask etc. So for running our django application, we need what is called a Application server. This is where we will use Gunicorn.
Gunircorn

Gunicorn is an application server written to work with any WSGI compatible framework. Web Server Gateway Interface (WSGI) is a standardised way of receiving requests inside an application. It stardardizes the recieving method’s arguments, outputs etc. Now, the Gunicorn server is what will host our django code, and help it communicate with Nginx.
So, finally, our stack looks something like this
Docker
We have our application, database server, application server, and web server ready. So, how do we deploy this REST API? We could buy a server machine, install the same OS as ours on it, install the dependencies, and run all the servers on it (since its a small app). Sure. Is that portable though? What if you need to run it on multiple machines? What if you bought a machine with a different OS? You’ll have to reinstall the OS on that.
So, to make our application more portable, and to make sure it runs exactly the same as it does on our machine. We use Docker. Docker creates containers that are basically packages containing, our application, its dependecies and a small OS image consisting of only user-space funcionalities. Basically, a container becomes a fully independent package capable of running on any Docker compatible machine. So, you don’t have to worry about installing different operating systems or writing multiple sets of instructions. The explanation here is kept short for the purpose of the tutorial, refer this link to find out more. Also read this article to know about another technology called Virtual Machines that can be used for the same purpose, but is less efficient for our use.
TUTORIAL
Installation and set up
Before we move on to the steps, lets first install docker on our machine. You can find steps for your machine on Docker’s installation page. Furthermore, we will also require installation of Docker Compose, which is a software required to run multiple dockerised containers. Find the instructions here.
Create a requirements.txt file in your project/ directory to list the python libraries we need. You can do this simply by typing the following while inside your virtual environment.
(django): $pip freeze > requirements.txt
We can use this file later to install python dependencies on any fresh python installation.
Also, since we will be running multiple containers, Its best to put your project/ directory in a new directory. Let’s called it Django-Docker/. We will refer to this as the root directory from now.
Dockerizing the Django application
Let’s first dockerize the existing application from the last tutorial. To start with this, create a new file Dockerfile in the project/ directory. And write this inside it.
# Docker Image
FROM python:3.9.1-alpine

# Create directory for user
RUN mkdir -p /home/app

# create the app user. Root user is bad practice
RUN addgroup -S app && adduser -S app -G app

# Set env variables
ENV HOME=/home/app
ENV APP_HOME=/home/app/web
ENV PYTHONDONTWRITEBYTECODE 1
ENV PYTHONUNBUFFERED 1

# Create the appropriate directories
RUN mkdir $APP_HOME
WORKDIR $APP_HOME

# Install development tools for alpine
RUN apk add --no-cache postgresql-libs
RUN apk add --no-cache --virtual .build-deps gcc musl-dev postgresql-dev

# install dependencies
RUN pip install --upgrade pip
COPY ./requirements.txt .
RUN pip install -r requirements.txt --no-cache-dir
RUN apk --purge del .build-deps

# copy stuff
COPY . $APP_HOME

# Give permissions to the new user for file useage
RUN chown -R app:app $APP_HOME

# Change root user to app user
USER app
Basically what we’re doing here is, writing instructions for the container (which you can imagine as a new server/terminal) to install things for our application and then run.
-
Docker Image : Now, each docker container is instantiated from a Docker image. A Docker image is a read-only template that contains a set of instructions for creating a container that can run on the Docker platform. Now, the docker container we are going to make, will require some dependencies, and installed python engine on it. We get this by using a parent image of python-3.9.1-alpine. This contains instructions for an alpine distribution of LINUX with python-3.9.1 installed on it. Images are available for the most common types of software on Dockerhub.
-
User creation and ownership : While we need the root user to create and install things in the beginning. It is a good deployment practice to change the user to a non-superuser after creation. Because a super-user on the container, can gain access to the host system as a root user in case they manage to break the container. At the end of the script, you can see that we copy our entire project to the $APP_HOME directory and give the new user ownership of the $APP directory. We then change our user to the new user.
-
Environment variables: The HOME variables are directories for the user and the app itself, on the container instance. We also set our WORKDIR to $APP_HOME, so that the current working directory becomes $APP_HOME.
-
Installation: First we install some libraries that we will need to install dependencies on python. Remember this was also the case when installing psycopg2 in the previous tutorial. After this, we install all our python dependencies in one go, using
pip install -rcommand followed by filename. After installation, we delete some of the dev libraries as theyre not required for running the program.
Now our Django application is dockerized. So, now we can create an image of this:
:Django-Docker/project$ sudo docker build -t app .
This will create an image called app from the current folder’s Dockerfile (If we had named the file something else, we could still use it by mentioning it in the command). Now, we use this umage to spin up a container using: (written in 2 lines for easy reading)
:Django-Docker/project$ sudo docker run --detach -p 8000:8000 \
-t app python manage.py runserver 0.0.0.0:8000
Using --detach, we run the command in a separate fork, so our terminal is not binded to the container (this is optional). Using --expose, we expose the port 8000 of the container to listen to requests, and with -p 8000:8000 we bind our computer’s port 8000 to the container’s port 8000. So if we send a request to our computer’s port 8000, it will go to the container, and then to the application, since we are hosting on 0.0.0.0:8000.
But if you run this command right now, you might be getting a database connection error. This is simply because, there is no Postgres database instance in that container!. So can we install postgres in this container too? Sure!, but that is not a good practice. Ideally, each component should run on separate containers. That would allow us to run the database server on a different machine as well.
Setting up Database and Docker-compose
This is where we need Docker-compose. This tool will help run the docker run command for us for multiple containers, and then allow us to network between them. Let’s start by creating a docker-compose.yml file in the Django-Docker directory. Inside that, write this:
version: '3.7'

services:
  web:
    build: ./project
    command: python3 manage.py runserver 0.0.0.0:8000
    ports:
      - 8000:8000
    env_file:
      - ./.env.web.dev
    depends_on:
      - db

  db:
    image: postgres:12.0-alpine
    volumes:
      - postgres_data:/var/lib/postgresql/data/
    env_file:
      - ./.env.db.dev

volumes:
  postgres_data:
This file will define the 2 containers we need for running our application from tutorial 1, on the default django server.
- web: This basically replaces our previous
docker runcommand. It performs all the same functions, except for 2 things. Here, we have set a dependency of this contained on the db container using depends_on. This way, the web container is only run if the db container is up. Secondly, we created an environment variable file for our application. While, for our applciation its not exactly necessary, its a very good programming practice.
Let’s say we had to upload our project on git, then our Django-Docker/project/project/settings.py would also get uploaded on it, and that file contains our SECRET KEY!. So its a common practice to store such values in an environment variable. Other information that may need to be switched without rebuilding the entire application is also stored in such places, so that a simple restart can make the change. So, in you Django-Docker/ directory, create a file .env.web.dev.
  DEBUG=1
  SECRET_KEY=<your key here>
  DJANGO_ALLOWED_HOSTS=localhost 127.0.0.1 [::1]
  SQL_ENGINE=django.db.backends.postgresql
  SQL_DATABASE=postgres
  SQL_USER=postgres
  SQL_PASSWORD=1234
  SQL_HOST=db
  SQL_PORT=5432
  DATABASE=postgres
And to compliment this change, change your settings.py as follows
  import os
  #.. other imports

  #..code

  SECRET_KEY = os.environ.get("SECRET_KEY")
  DEBUG = int(os.environ.get("DEBUG", default=0))
  ALLOWED_HOSTS = os.environ.get("DJANGO_ALLOWED_HOSTS").split(" ")

  #..code

  DATABASES = {
      'default': {
          "ENGINE": os.environ.get("SQL_ENGINE", "django.db.backends.sqlite3"),
          "NAME": os.environ.get("SQL_DATABASE", os.path.join(BASE_DIR, "db.sqlite3")),
          "USER": os.environ.get("SQL_USER", "user"),
          "PASSWORD": os.environ.get("SQL_PASSWORD", "password"),
          "HOST": os.environ.get("SQL_HOST", "localhost"),
          "PORT": os.environ.get("SQL_PORT", "5432"),
      }
  }

  #....code
As it is very apparent from the code, our settings.py will now import all the values from the environment variables instead of hardcoded values.
- db: This part creates a new container with the parent image of postgres:12.0-alpine. Which is another alpine linux installation, with only postgres installed in it. A cool thing about this image is that it creates the default user according to the environment variables set (for reference, see here). So, by setting a different environment variables file like .env.db.dev, we can set the USER, PASSWORD and PORT of our postgres installation. So create this file:
  POSTGRES_USER=postgres
  POSTGRES_PASSWORD=1234
  POSTGRES_DB=postgres
Please make sure the variable names match here exactly, since that is crucial for postgres to identify it with. Also, if you’re wondering what the volume tag is for. It is to create a separate drive and mount it in the postgres database storage, so that we have a place for persistent storage of data after the container stops. It should be available in the /var/lib/docker/volumes folder on the host.
Also do notice that we’re not making a new Dockerfile for this container, because there no specific commands to run in this case. We’re using the parent image straight out of the box.
At this point, our database and our django app are prepared to run. Let’s add one quick command at the end of our django project’s Dockerfile:
...rest of the code

USER app

ENTRYPOINT ["/usr/src/app/entrypoint.sh"]
And create a file called entrypoint.sh in the Django-Docker/project/ directory
#!/bin/sh

if [ "$DATABASE" = "postgres" ]
then
    echo "Waiting for postgres..."

    while ! nc -z $SQL_HOST $SQL_PORT; do
      sleep 0.1
    done

    echo "PostgreSQL started"
fi

python manage.py flush --no-input
python manage.py migrate

exec "$@"
This is a small bash script that checks if the database is up before proceeding to flush it and do any migrations required (basically, what we did manually in tutorial 1 after creating the database). You also need to give it execute permissions using
$ chmod +x project/entrypoint.sh
Now our Django-Postgres application is ready to be run on the default server. Run it in the Django-Docker/ directory using:
:Django-Docker$ sudo docker-compose build
:Django-Docker$ sudo docker-compose up -d
This should run your application on localhost:8000 as planned. If it does not run, you can check for errors on :Django-Docker$ sudo docker-compose logs -f
Almost done !
Now all that is left is to connect it to an Gunicorn and Nginx server.
Gunicorn
This part is really simple. Since gunicorn is a python based application server there is no need for a new container with a different image. Simply add gunicorn==20.0.4 to your requirements.txt file, then change command tag for the web container in the docker-compose.yml to the following
command: gunicorn project.wsgi:application --bind 0.0.0.0:8000
Also add another tag to the same container
expose:
      - 8000
This line will connect gunicorn to the django app through the wsgi.py file in your django project directory (remember? we ignored this in tutorial 1). This will also bind gunicorn to the port 8000. The expose tag we added will then expose this port to other containers within the same docker-compose. But we can’t run it just yet, gunicorn will not accept http requests rn, so let’s connect the nginx web server.
Nginx
This requires a little bit of configuration, so make a new directory in the Django-Docker/ directory. Let’s call it Nginx/. Inside this, create a Dockerfile and a nginx.conf file.
The Dockerfile should contain
FROM nginx:1.19.0-alpine

RUN rm /etc/nginx/conf.d/default.conf
COPY nginx.conf /etc/nginx/conf.d
Basically, we’re loading a parent imagine with Nginx installed on alpine, then replacing its default config with our own configuration file. Now in nginx.conf file
upstream project {
    server web:8000;
}

server {

    listen 80;

    location / {
        proxy_pass http://project;
        proxy_set_header X-Forwarded-For $proxy_add_x_forwarded_for;
        proxy_set_header Host $host;
        proxy_redirect off;
    }

}
Here we first define our application server’s port number in the upstream part. Notice this is the exposed port 8000 of the gunicorn container. This way, we can forward our parsed http requests to the port 8000 of the server.
Next, we make a port for listening to incoming connections, we’re putting this on port 80, which is usually used by web servers. …//
That’s it!
Now we can run up our full system using the following commands
#For shutting down older conatiners
:Django-Docker$ sudo docker-compose down -v
:Django-Docker$ sudo docker-compose up -d --build
Now, go to http://localhost:1337 to test your REST API just like in tutorial 1.
Code can be found at the repository link
The code on the repository is slightly modified. If you’re trying to run that, use the “prod” workflow wherever possible, to match the results in this tutorial.